UICollectionView in iOS is a very useful and powerful class for displaying large sets of data. However, with great power comes great configurability, and this configurability can make it tedious for simple use cases. A common use case for a UICollectionView is displaying a grid of items instead of rows that the UITableView uses. Unfortunately with UICollectionViewFlowLayout, you still have to do manual computations for each item, even if you want them to be the same size. I’m going to show you how to make a simple, yet useful, grid-based UICollectionViewLayout.
Design Goals
The goal of this layout is to make it easy to layout items in a grid fashion. This is how we intend to use our new layout, GridLayout:
let gridLayout = GridLayout()
gridLayout.fixedDivisionCount = 3 // Columns for .vertical, rows for .horizontal
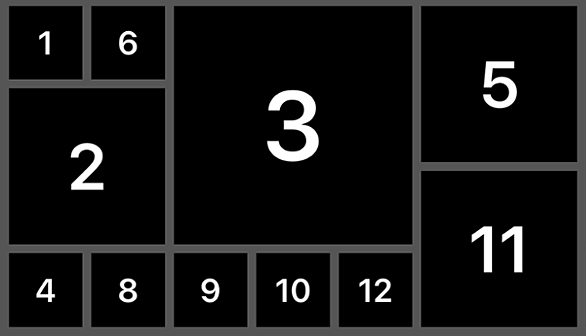
collectionView.collectionViewLayout = gridLayoutThat’s it, no having to compute the size of each cell, nor specifying the interitem and interline spacing of the flow layout and you’ll end up with a layout like this:
Getting started
When creating a custom UICollectionViewLayout, you need to provide several pieces of information on how to display the collection view and the elements within it. The first piece of information is how big the collection view will have to be to display all of the items within it. The collectionViewContentSize is used to indicate the length and width of the collection view and it is the bounding rectangle around all of the items. If the collectionViewContentSize is smaller than (or equal to) the collection view frame in one or more dimensions, it will not scroll in those directions. You usually will need to know where all the items go first before being able to compute this.
The next information a layout needs to provide is which items are within a bounding rectangle. Since a UICollectionView is a UIScrollView, what is currently displayed is controlled by the bounds property. When the bounds change on a scroll, the collection view needs a way to determine which items to show. This is handled by the layoutAttributesForElements(in:) function. Whenever a scroll happens, the new bounds is passed into this function and layout needs to supply the attributes which are within the rectangle. There is also the similarly named layoutAttributesForItem(at:) that is used by a collection view to retrieve layout attributes for a specific item.
The final piece needed when creating a custom layout is indicating when the layout needs to be recalculated. Usually, a layout will need to be recalculated if the device rotates or if the collection view’s size changes. This can be determined with shouldInvalidateLayout(forBoundsChange:). This function is called every time the collection view bounds change, including when it scrolls. In this function, you can check to see if the collection view size has changed in a manner that would cause the layout to need to be recalculated – for example, if a layout scrolls vertically, but not horizontally, a width change would probably necessitate a layout recalculation, whereas a height change should not.
To recap, the four pieces necessary for building a custom layout are:
-
collectionViewContentSize -
layoutAttributesForElements(in:) -
layoutAttributesForItem(at:) -
shouldInvalidateLayout(forBoundsChange:)
However, there are a few others that are necessary depending on your specific application: prepare for generating a cache, invalidateLayout for clearing any cache, layoutAttributesForSupplementaryView(ofKind:at:) for headers and/or footers, and layoutAttributesForDecorationView(ofKind:at:) for when you want to add flair to certain items. Also, if you support adding, removing, animating, or moving elements there are several more methods to implement. They are more advanced and we won’t be using any of them today.
We’ll be using the prepare and invalidateLayout methods since we will be using a cache. For up to several hundred items, Apple recommends using a cache – much larger and the performance may not be worth the memory usage. Although we will be making a grid and it’s trivial to compute where an item should go in the grid, we’re going to add a wrinkle that will make it necessary to precompute the entire layout. With our grid layout, we will want the ability to have certain items to be displayed twice or maybe even thrice as large as the default item. When using a cache, the majority of the work for the layout should be done within the prepare method to prevent having to do heavy calculations in the middle of a scroll. Other methods can then use the precalculated information to quickly return from their calls. In our grid layout, we will only allow scrolling in one direction, so we have to figure out how much room we have to work with in the opposite direction.
Building the cache
In our example, we’ll be talking about a vertically scrolling UICollectionView. Once we know what direction we’re scrolling, how many items per row, and the width of the view, we can start calculating UICollectionViewLayoutAttributes for each item. In the prepare function:
let fixedDimension: CGFloat
if scrollDirection == .vertical {
    fixedDimension = collectionView.frame.width - (collectionView.contentInset.left + collectionView.contentInset.right)
    contentWidth = fixedDimension
} else {
    fixedDimension = collectionView.frame.height - (collectionView.contentInset.top + collectionView.contentInset.bottom)
    contentHeight = fixedDimension
}

itemDimension = (fixedDimension - (CGFloat(fixedDivisionCount) * itemSpacing) + itemSpacing) / CGFloat(fixedDivisionCount)
NOTE: All code is Swift 3. Most of these samples will need helper code available from the gist.
For each item in the collection, we will find the next available grid position (it may not be obvious since we allow double and triple size items), create a UICollectionViewLayoutAttributes object, and then update the content height if necessary. We only increment the fixedIndex when an item fits where we intended. This allows for the grid to retry every position until it can find an item to fit, preventing ‘holes’ from forming in the grid. Continuing in the prepare function:
for section in 0 ..< collectionView.numberOfSections {
    sectionedItemGrid.append([])
    var flexibleIndex = 0, fixedIndex = 0
    for item in 0 ..< collectionView.numberOfItems(inSection: section) {
        if fixedIndex >= intFixedDivisionCount {
            // Reached end of row in .vertical or column in .horizontal
            fixedIndex = 0
            flexibleIndex += 1
        }

        let itemIndexPath = IndexPath(item: item, section: section)

        // We'll update this later to use a delegate
        let itemScale = 1
        let intendedFrame = ItemFrame(section, flexibleIndex, fixedIndex, itemScale)

        // Find a place for the item in the grid
        let (itemFrame, didFitInOriginalFrame) = nextAvailableFrame(startingAt: intendedFrame)

        reserveItemGrid(frame: itemFrame)
        let itemAttributes = layoutAttributes(for: itemIndexPath, at: itemFrame)

        itemAttributesCache.append(itemAttributes)

        // Update flexible dimension
        if scrollDirection == .vertical && itemAttributes.frame.maxY > contentHeight {
            contentHeight = itemAttributes.frame.maxY
        } else if itemAttributes.frame.maxX > contentWidth {
            contentWidth = itemAttributes.frame.maxX
        }

        if (didFitInOriginalFrame) {
            fixedIndex += 1 + itemFrame.scale
        }
    }
}
Now the real meat and potatoes of prepare is in the nextAvailableFrame function. Given an initial starting ItemFrame, it checks the available grid locations, and moves along them until there is a space available to hold the item. To do so, it checks to see if any previous items are occupying any of the spaces that the item would need. It will continue moving along the scrolling dimension, adding rows for .vertical and columns for .horizontal until it can find a space.
private func nextAvailableFrame(startingAt originalFrame: ItemFrame) -> (frame: ItemFrame, fitInOriginalFrame: Bool) {
    var flexibleIndex = originalFrame.flexibleIndex, fixedIndex = originalFrame.fixedIndex
    var newFrame = ItemFrame(originalFrame.section, flexibleIndex, fixedIndex, originalFrame.scale)

    while !isSpaceAvailable(for: newFrame) {
        fixedIndex += 1

        // Reached end of fixedIndex, restart on next flexibleIndex
        if fixedIndex + originalFrame.scale >= intFixedDivisionCount {
            fixedIndex = 0
            flexibleIndex += 1
        }

        newFrame = ItemFrame(originalFrame.section, flexibleIndex, fixedIndex, originalFrame.scale)
    }

    // Fits iff we never had to walk the grid to find a position
    return (newFrame, flexibleIndex == originalFrame.flexibleIndex && fixedIndex == originalFrame.fixedIndex)
} 
The Rest of the Functions
And then you’re done! Well not quite, there are a few more steps involved in creating this working grid layout. We have to implement the rest of the necessary methods to actually work with the now generated cache. First, we need to indicate the size of the collection view content:
override var collectionViewContentSize: CGSize {
    return CGSize(width: contentWidth, height: contentHeight)
}
We then need to implement the method for finding all the attributes within a bounding rectangle (the visible bounds) in the collection view. We can filter the cache to quickly return all of matching attributes.
override func layoutAttributesForElements(in rect: CGRect) -> [UICollectionViewLayoutAttributes]? {
    return itemAttributesCache.filter { $0.frame.intersects(rect) }
}
We also need to be able to find the attributes for a specific item by index path. We could have also implemented this for more efficient lookups by having the index path section and item be used as indices in an array of arrays, but this works well enough for smaller data sets.
override func layoutAttributesForItem(at indexPath: IndexPath) -> UICollectionViewLayoutAttributes? {
    return itemAttributesCache.first { $0.indexPath == indexPath }
}
We now need to configure how a layout becomes invalid and what to do about it. Our layout should be invalidated when the view changes width (like when the device rotates) since the width of each item is dependent on the width of the collection view. And to invalidate, we reset all of the layout information we’ve previously collected.
override func shouldInvalidateLayout(forBoundsChange newBounds: CGRect) -> Bool {
    if scrollDirection == .vertical, let oldWidth = collectionView?.bounds.width {
        return oldWidth != newBounds.width
    } else if scrollDirection == .horizontal, let oldHeight = collectionView?.bounds.height {
        return oldHeight != newBounds.height
    }

    return false
}

override func invalidateLayout() {
    super.invalidateLayout()

    itemAttributesCache = []
    contentWidth = 0
    contentHeight = 0
}
Adding the delegate
If we want to allow certain items to be at a larger scale, we need to give the data source a way to tell us which item needs to be larger. We can do this with a delegate, GridLayoutDelegate. The delegate will have one method, scaleForItem(inCollectionView: UICollectionView, withLayout: UICollectionViewLayout, atIndexPath: IndexPath) -> UInt, which will return the scale of the item (from zero to the fixedDivisionCount) for a given index path. We also use a protocol extension to give a default behavior and have GridLayout implement the protocol (without implementing the method) to ensure we have the correct behavior.
protocol GridLayoutDelegate: class {
    func scaleForItem(inCollectionView collectionView: UICollectionView, withLayout layout: UICollectionViewLayout, atIndexPath indexPath: IndexPath) -> UInt
}

extension GridLayoutDelegate {
    func scaleForItem(inCollectionView collectionView: UICollectionView, withLayout layout: UICollectionViewLayout, atIndexPath indexPath: IndexPath) -> UInt {
        return 1
    }
}

class GridLayout: GridLayoutDelegate {}
We can then implement this protocol (and provide an implementation) in our view controller/data source code to scale specific items. And we can update our code in the prepare function to take advantage of this behavior, calling our function for each item to get the item scale:
let itemIndexPath = IndexPath(item: item, section: section)

// We'll update this now to use a delegate
let itemScale = indexableScale(forItemAt: itemIndexPath)
let intendedFrame = ItemFrame(section, flexibleIndex, fixedIndex, itemScale)

// Find a place for the item in the grid
let (itemFrame, didFitInOriginalFrame) = nextAvailableFrame(startingAt: intendedFrame)
And the helper function around the delegate:
weak var delegate: GridLayoutDelegate?

private func indexableScale(forItemAt indexPath: IndexPath) -> Int {
    var itemScale = (delegate ?? self).scaleForItem(inCollectionView: collectionView!, withLayout: self, atIndexPath: indexPath)
    if itemScale > fixedDivisionCount {
        itemScale = fixedDivisionCount
    }
    return Int(itemScale - 1) // Using with indices, want 0-based
}
Wrapping it up
And there we go, a grid layout that allows a user to dynamically scale certain items in the collection view, no having to compute the size of each cell, nor specifying the interitem and interline spacing of the flow layout! Allowing certain items to be different sizes prevents location from being a function based off of index and section, since larger scaled items may be in different locations than might be initially expected. Removing this option would allow for a layout that does not require a cache and thus the prepare and invalideLayout methods.
This layout also implements the bare necessities to get a working layout. If you’re looking for how to add headers or change the cell size to not be square, check the source code, I’ve added a few more protocol methods to help you out! Be sure to check out Apple’s reference documents on Creating Custom Layouts and the UICollectionViewLayout reference for more information about the various other functions you can implement.. Also, Ray Wenderlich’s site has a great tutorial for creating custom layouts.
An example project with a fully implemented GridLayout is available from our GitHub repository: PrimeGrid. If you just want the layout, this gist is available.

Hello,
I got a question about a segue from the generated layout.
What is the best way to segue from a generated UICollectionViewCell to a new ViewController?
Because u use a custom GridLayout the normal `func collectionView(_ collectionView: UICollectionView, didSelectItemAt indexPath: IndexPath)` is not working.
Awesome!!!