This blog piece was updated on 10/31/16 to include updated code from Objective-C to Swift. This post was originally published on 9/24/13.
We just finished a project where an entire technology stack was built in just four months. Six mobile applications, middleware services, multiple databases, point-of-sale systems, inventory management systems and kiosk ordering systems. Oh yeah, and each one had a number of different environments they could operate in (like development or production mode). We found out first hand just how important maintaining configuration data was and we’d like to share some of the techniques we used for managing these environments and generating multiple iOS applications from a single codebase.
Understanding Build Configurations
When you build an application, an absolutely insane amount of stuff happens that you rarely ever have to think about – because some really smart guy or gal on Apple’s compiler team already figured it out for you. However, if you were ever really interested in all of that stuff, you could open up the Log Navigator in Xcode after you build and select the Build item under your application name. A list of steps will appear in the editor area. When you click on a step, a small three-line icon will appear in its upper right corner. Clicking on that icon will reveal the actual commands issued during that step.
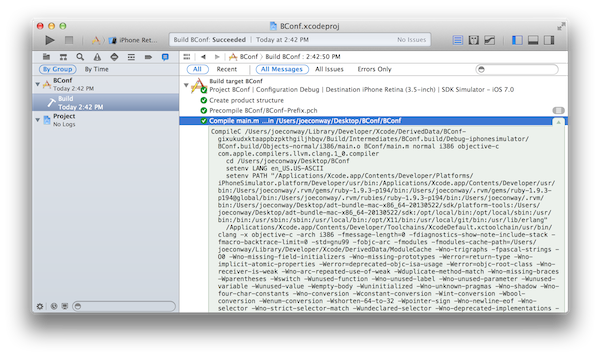
As you can see, all of the steps that go into building an application, like creating an application bundle, compiling source code, linking compiled code, and copying resources to the application bundle have a lot of extra information. This extra information, which dictates what exactly occurs during these commands, are defined by the current Build Settings.
One example of a build setting is Optimization Level. When testing an application, compiled code is not optimized because it gives the debugger more information, allowing you to step through code with LLDB. When releasing to the App Store, code is optimized to run faster and take up less memory, but you wouldn’t be able use the debugger to accurately diagnose issues.
Since it makes sense to be able to toggle between optimized code for releasing an application and non-optimized code for debugging an application, Xcode has the concept of Build Configurations. Each one has its own set of values for each possible Build Setting. When you build the application, you choose which Configuration you’d like to use.
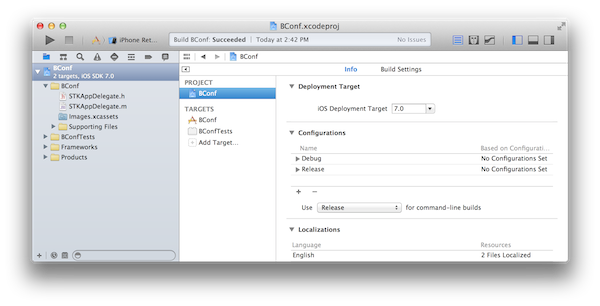
When you create a new project, two configurations are automatically created, Debug and Release. You can see a project’s configurations – and create new ones – by selecting the project in the project navigator, then selecting it again in the editor area and looking at the Info pane.
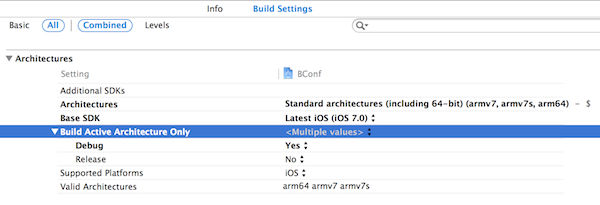
 A one has a value for each build setting. Most Build Settings have the same value no matter which configuration is being used, however, you can see that settings like Build Active Architecture Only have a different value for each Configuration.
To determine which Configuraion – and its associated Build Settings – are used when building your application, you must look at the selected Scheme. The Scheme Chooser is located next to the Play/Stop buttons in the top left corner of the Xcode window and will default to the name of the project. Click on the Scheme Chooser and select Edit Scheme… from the menu that appears.
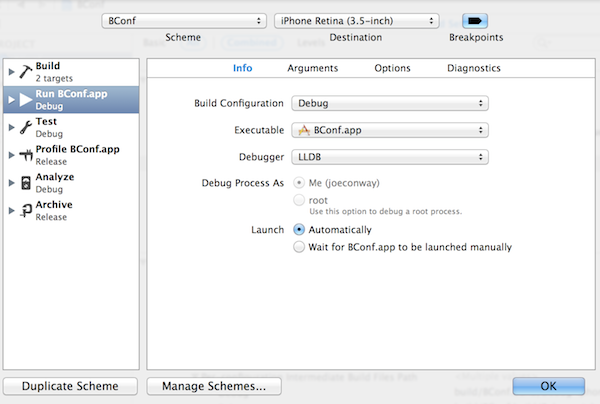
On the left table, each possible build action (Run, Test, Profile, Analyze, Archive) is listed. Underneath each of those items is the Configuration that will be used for that action. You can change the configuration by selecting the item and changing the associated pop-up menu.
Now, let’s see how this information is actually useful.
Conditional Compilation Blocks
It is quite often the case that your iOS application hits a web server. It is also likely that the web server has a production and development environment; after all, if your app is in the wild you don’t want to screw up real user data while you test a new feature. These servers will have different URLs or ports to distinguish between them.
Configurations and Schemes are really useful for this situation. By setting up a Configuration for the development environment and production environment and creating a scheme for each of those build configurations, toggling between hitting the development and production server is easy and error-free.
In the Active Compilation Conditions build setting, you can add a USE_DEV_SERVER flag to the development server configuration.

In your code, you likely (or at least should) have a method on your store that returns the host name for all the services used in that store. In that method, you can use conditional compilation blocks to determine which host to use:
class func baseURLString() -> String {
    #if USE_DEV_SERVER
        return "https://dev.stablekernel.com"
    #else
        return "https://prod.stablekernel.com"
    #endif
}
By creating a scheme for each one of these build configurations, switching between servers is as simple as selecting the appropriate scheme before building.
Related: Learn how to master Xcode
Minimize Usage
Of course, the sky is the limit here: we can make plenty of compile-time decisions about what code will be executed depending on the scheme/configuration being used. But, we should warn you: use this trick sparingly. It’s pretty tough to read code that is littered with #ifs, so try to localize them to central objects and not let them spread across the entire codebase.
For example, one of the challenges we faced in our most recent project was that the application was actually two separate applications. One application would be used by Americans and the other by Canadians; they had different branding, used a different payment processor, different icons, a different bundle identifier and a different display name on the springboard. However, other than that, the applications were the same. It didn’t make sense for us to create two codebases because more than 99% of the code was going to be the same for both applications.
Therefore, we created another configuration and associated scheme for each application (technically, we created two for each application, for both production and development environments). Each application configuration had its own flag, US_TARGET or CAN_TARGET.
Because of the different branding in each application, a few images resources were specific to their applications. For example, the default button background image was represented by a different image for each application. We could have gone to every place in the code where we had one of these buttons and done something like this:
#if US_TARGET
    button.setBackgroundImage("us_button", for: .normal)
#elseif CAN_TARGET
    button.setBackgroundImage("canada_button", for: .normal)
#endif
But that would get really ugly, because that button was used so much in the application. Instead, we gave each image that had a different version a prefix and localized the image loading code into a singleton.
class STKUI {
    class func image(named imageName: String) -> UIImage? {
        // If this image is common to both apps, we'll
        // get the image here.
        if let img = UIImage(named: imageName) {
            return img
        }

        // If this image has an app specific prefix, use
        // the preprocessor macro to determine the prefix.
        let prefix: String
        #if US_TARGET
            prefix = "us_"
        #else
            prefix = "canada_"
        #endif

        // Now try and get that image again with the prefix.
        return UIImage(named: prefix + imageName)
    }
}
Now, in our code, we could do this:
button.setBackgroundImage(STKUI.image(named: "button"), for: .normal)
If there was an image specific to that application, it would fetch the appropriate one. If this was a common image between both applications, it would grab that common image without a prefix.
User-Defined Settings
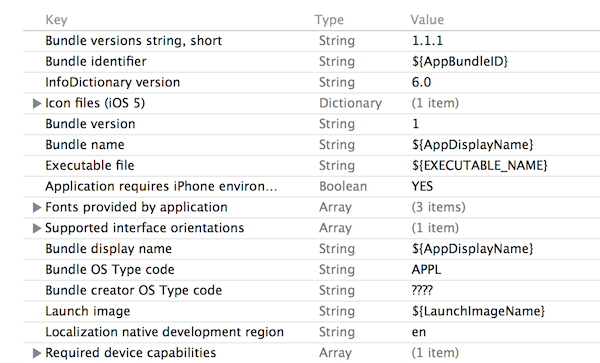
The final piece of the puzzle involved configuring the information in an application’s Info.plist, like icon, bundle identifier, display name and launch image. Configurations can help us here, too.
At the end of build settings section, there is an area named User-Defined. Here, you can add any setting you like and set its per-configuration value. These settings can be used in an application’s Info.plist and any additional build scripts in the Build Phases section.
So, we created an AppBundleID user-defined setting and set it to either com.company.usapp or com.company.canadaapp (not real names, these are bad names) depending on the Configuration. Then, in the Info.plist, we could reference the value of these settings – notice the ${Setting} markup:
Some Useful Tips
When modifying a build setting, remember that each setting has a number of different levels. First, each setting has a default for the platform you are building against – like iOS or Mac OS X. If you don’t set the value of this setting in your Build Settings anywhere, this is the value that is used.
Next, the project itself has Build Settings. The project’s build settings replace the platform default settings and can be configured by selecting the project’s Build Settings pane.
Finally, each target has its own Build Settings which override the project’s build settings. Where you choose to change your settings value should be determined by the level in which they need to occur. A good default is the project level.
Also, one thing that can bite you: when you edit a scheme, you can choose which build configuration to use for each build action. However, by changing the configuration used for a specific build action, you don’t change it for other build actions. Thus, changing a scheme’s Run configuration doesn’t change that scheme’s Archive configuration. This can be easily overlooked when preparing your build for distribution – everything works correctly when you run it from Xcode, but as soon as you deploy it, the wrong build configuration is used! Make sure to change every build action in each scheme to the same configuration.