When a view controller container shows a new child view controller onto the screen, it sometimes makes sense to animate that introduction.
Make sure to check out the previous installments of this series on view controller containers here, here and here.
For example, a UINavigationController will slide the old child view controller off the screen to the left while sliding the new child view controller onto the screen from the right.
This effect creates a visual cue for the user that indicates that they have moved deeper into a workflow. It also informs the user that the previous view controller is ‘somewhere off to the left’, leading them to look for a back button somewhere on the left side of the screen. Couple this animation with the consistent visibility of the navigation bar, and the user is drawn to the left side of the navigation bar when they want to return to a previous view controller. Not-so-coincidentally, that is where the back button is.
We take stuff like that for granted, but it those kinds of simple brilliances that allow my grandmother and my three old nephew to use the same computer that I use.
So, the visual cue is important. It informs the user of some functionality that otherwise wouldn’t be obvious or leads them to that functionality more quickly than doing a full scan of the screen. In saying that, I’ve effectively issued the standard disclaimer about gratuitous animations.
Now, it may make sense for your application to override the default animation for an existing container view controller or allow an application to customize your own container view controller’s animation. There are a number of classes and protocols that exist to provide this ‘custom transitioning’ behavior in a safe and standardized way.
Custom Transitions
Some container view controllers have a ‘default’ animation for swapping view controllers – like UINavigationController’s sliding animation. Before custom transitions, that was the animation you got when you used a navigation controller. If you wanted to change that animation, you could either subclass UINavigationController and hack at its likely-to-change internals or you would rewrite UINavigationController yourself. Both situations are time-consuming and full of dangers.
(Or, you could download a ‘solution’ as a pod or whatever the cool kids are doing these days, which reduces the time-consuming part down to zero, but doubles down on the dangerous part.)
With the custom transition pattern, we have a safe way to do this. UINavigationController, UITabBarController, and modal view controllers all utilize the custom transition pattern. Each of these classes has a default animation, but leave in hooks for letting some other object to take over.
It is reasonable, then, that offering custom transitions in your own custom container view controllers would also use this same pattern. It is just as reasonable, that, before we implement custom transitions in our own container view controller, we should first learn how the built-in containers work with custom transitions.
In fact, this is general advice that should always be followed: if you are replacing, creating an alternative to, or improving something that already exists in the iOS SDK, you must make sure it behaves the same way its predecessor does.
There are expectations that certain types of components – especially view controllers or views – will work together in a certain way. These components are part of a greater system that works rather flawlessly if you play by the rules. Ignoring those rules is like replacing your iPhone’s power cord with a cheap knock-off: you will eventually start a fire.
For example, you could write a container view controller that somehow managed to omit sending viewDidAppear: to its children in certain circumstances. By doing this, you have broken the contract that every view controller has with the system: “When your view appears, you will know about it.”
Once a contract of that magnitude is broken, your whole application spirals out of control. Every line of code you write is one line further from a stable application, because its core is rotten. Your objects can’t trust each other, so they make up for each other’s shortcomings, which makes them co-dependent – i.e., one tightly-coupled, spaghettied mess. (Have you ever noticed that every design pattern we have can be expressed as a human relationship?)
A Testable Application
With that tirade out of the way, let’s create a quick project to implement custom transitioning for a UITabBarController. Create an empty project, name it whatever you want. Create a UIViewController subclass, STKViewController. Give it a new designated initializer in STKViewController.h:
@interface STKViewController : UIViewController

- (id)initWithColor:(UIColor *)color;

@property (nonatomic, strong) UIColor *color;

@end
Then, in STKViewController.m, write the following code:
@implementation STKViewController

- (id)initWithColor:(UIColor *)color
{
    self = [super initWithNibName:nil bundle:nil];
    if(self) {
        [self setColor:color];

        float r, g, b;
        [[self color] getRed:&r green:&g blue:&b alpha:nil];
        NSString *title = [NSString stringWithFormat:@"%d %d %d",
                           (int)r * 255,
                           (int)g * 255,
                           (int)b * 255];
        [[self tabBarItem] setTitle:title];
    }
    return self;
}

- (id)initWithNibName:(NSString *)nibName bundle:(NSBundle *)bundle
{
    return [self initWithColor:[UIColor whiteColor]];
}

- (void)viewDidLoad
{
    [super viewDidLoad];
    [[self view] setBackgroundColor:[self color]];
}

@end
This gives us an easy way of creating multiple view controllers with different colored views to see the swap animation. It is important that when you create something, you have a reliable and effective way of ensuring it works and that it fails predictably. For creating container view controllers, shoving in a few multi-colored view controllers into the container is a great test harness.
In the app delegate, set up a tab bar controller and populate it with a few STKViewControllers.
- (BOOL)application:(UIApplication *)application
didFinishLaunchingWithOptions:(NSDictionary *)launchOptions
{
    self.window = [[UIWindow alloc] initWithFrame:[[UIScreen mainScreen] bounds]];

    UITabBarController *tbc = [[UITabBarController alloc] init];
    [tbc setViewControllers:@[
        [[STKViewController alloc] initWithColor:[UIColor redColor]],
        [[STKViewController alloc] initWithColor:[UIColor greenColor]],
        [[STKViewController alloc] initWithColor:[UIColor blueColor]]
    ]];
    [[self window] setRootViewController:tbc];

    self.window.backgroundColor = [UIColor whiteColor];
    [self.window makeKeyAndVisible];
    return YES;
}
You can run the application and see that the tab bar controller works as you would expect and tapping on each tab takes you to the associated view controller. Now, we can customize that transition. Let’s look at the high-level process by which a tab bar controller’s transition gets animated.

Following this flowchart, when the tab bar controller is transitioning between view controllers, it first asks its delegate if the transition should be customized. If the delegate thinks the transition should be customized, it offers up an object that will facilitate that transition – the ‘Animation Controller’ in the figure.
The delegate then steps aside, and the tab bar controller starts talking to the animation controller object. The tab bar controller will pass information to the animation controller object – like which view controllers are moving on/off the screen, where those view controller’s views are currently located on the screen, and where those views need to end up when the animation completes. The controller object will then perform the animation.
Once the animation has finished, the animation controller will inform the tab bar controller. At that point, the tab bar controller will finalize its state and fire off messages like viewDidAppear: and viewDidDisappear:. The transition is complete.
Let’s make our sample application handle that same flow. First things first, we must establish which object is the delegate for the tab bar controller. That leads me into my next preachy section… (did you think you were just going to copy and paste some code to get custom transitions?)
The Principles of Delegation
An application is a tree of objects. The root of that tree is the UIApplication object itself. In order for an object to survive for longer than the scope of a method, it must be connected to that tree somehow. The first attachments to the tree are the application delegate, the window and the root view controller of that window. These are the foundations of the tree – the trunk, if you will. They are anchored to the tree and won’t be going away – that is, there exists a strong reference to them from either the root or other objects in the trunk.
Then come the major arterial branches of the tree. These are the view controllers that are contained in the root container view controller of the window. They are sturdy, they aren’t going anywhere, but they don’t know much about the branches heading off in other directions, they’re focused on themselves. They spawn smaller branches and leaves – more view controllers, model objects and view objects as necessary. They are all still attached to one tree, but it is clear that some objects are more ‘important’ than others.
So, an application looks kind of like this:
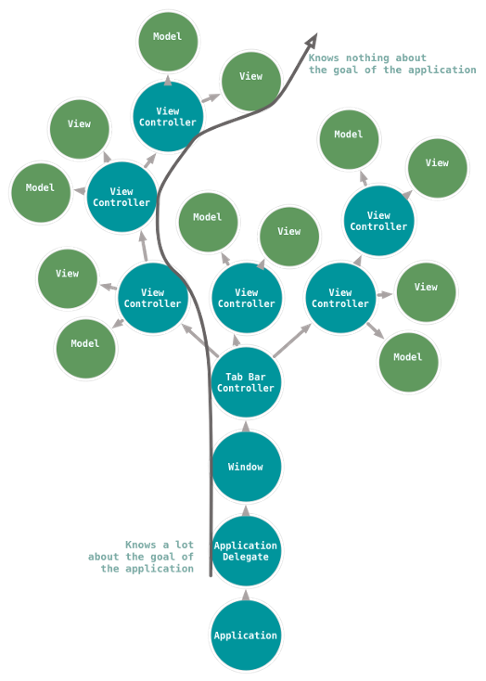
And yeah, I spent 10 minutes drawing a tree in UML, but it is to illustrate a point: the closer an object is to the root, the more it knows about the goals and structure of the application that it belongs to. The further away, the less it knows about the goals and structure of the application, but the more it knows about a specific detail the application utilizes.
For example, in the Phone application, it is the application delegate that decides there will be a tab bar controller with view controllers that the user will be able to switch between. These view controllers show a list of favorites, contacts, the keypad, recent calls and voicemail. This application delegate and its tab bar controller can change the fundamental features of the Phone application by simply changing the view controllers employed.
On the other side of that, a model object that represents a ‘Contact’ in the Phone application doesn’t have any idea what is going on in the application. Sure, it can hang onto names and phone numbers, but it doesn’t know why. That’s for more important objects – objects closer to the trunk – to decide. In fact, this is why well-written model and (especially) view objects can often be reused in other applications – they are decoupled from the bigger picture of a specific application.
Now, with this tree in mind, think about the delegate design pattern. Think about where you use it: UITableView, UIApplication, CLLocationManager, UIGestureRecognizer… what do all of these things have in common? They all know how to do a general task, but they don’t know how to translate that general task into something specific to the application. For example, a location manager knows how to find a location, but it doesn’t know if that location should wind up as a pin on a map, sent via a web service, or stored in a model object.
Thus, an object’s delegate is responsible for contextualizing information with respect to the application’s greater purpose.
This concept is inscribed into our tree: objects closer to the root know more about the purpose of the application. To determine where an object should delegate to, we look for the closest, more informed object in the tree – i.e., the object one step closer to the root. (This explains why delegate properties are not strong references: this same tree structure manages the lifecycle of objects, and objects closer to the root own the objects that they spawn.)
In our sample application, the object that spawned the UITabBarController is the app delegate. Thus, the app delegate should also be the tab bar controller’s delegate.
Back to Custom Transitions
So, we must set the tab bar controller’s delegate to the app delegate and then implement the method that answers the question, “Which object will handle the custom transition for this tab bar controller?” This is the ‘Animation Controller’ object we talked about previously. That code goes in your STKAppDelegate.m file:
// Having us conform to the delegate here
@interface STKAppDelegate () <UITabBarControllerDelegate>
@end

@implementation STKAppDelegate
- (BOOL)application:(UIApplication *)application
didFinishLaunchingWithOptions:(NSDictionary *)launchOptions
{
    ...

    // Setting the delegate here
    [tbc setDelegate:self];

    ...
    return YES;
}

// Implementing the UITabBarControllerDelegate method
- (id <UIViewControllerAnimatedTransitioning>)tabBarController:(UITabBarController *)tabBarController
            animationControllerForTransitionFromViewController:(UIViewController *)fromVC
                                              toViewController:(UIViewController *)toVC
{
    return self;
}
The message tabBarController:animationControllerForTransitionFromViewController:toViewController: is sent to the tab bar controller’s delegate when the tab bar controller is about to transition between view controllers. The object returned from this method will become responsible for the animation by implementing methods from the UIViewControllerAnimatedTransitioning protocol. Thus, an ‘Animation Controller’ is some object that conforms to UIViewControllerAnimatedTransitioning. It will be sent messages from this protocol on behalf of the tab bar controller.
Now, as you can see in this example, we’ve returned self from this method. That means we’re going to let the app delegate handle the animation. This flies in the face of my normal advice of “Don’t you dare put anything in the app delegate!”, but in this instance, it is actually okay. Why? The reason you avoid putting a lot of ‘globally accessible’ stuff in the app delegate is because it creates far-reaching dependencies in your application – if the leaves of the application tree are reaching back to the trunk, you have a mess on your hands. The less dependencies between objects (and therefore the less distinct responsibilities one object has), the easier it is to maintain and add features to that application. A bad tree looks like this:
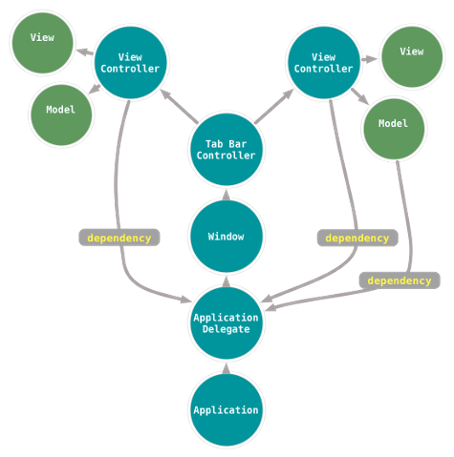
But in the case of the app delegate’s relationship with the tab bar controller, that is already a tight relationship. After all, the app delegate made the decision to create the tab bar controller, if it makes the decision to change out that tab bar controller, this animation dependency is right there in the same file. Now, this doesn’t mean that your custom transition code always goes in the app delegate, it just means that in this structure we have currently defined, it works. (We’ll discuss another approach to this later.)
An object responsible for handling a custom transition must conform to the UIViewControllerAnimatedTransitioning protocol. This protocol has two required methods, transitionDuration: and animateTransition:. The first method the tab bar controller will call simply returns the time (in seconds) that the animation will occur over. Add this method to the app delegate and declare that STKAppDelegate conforms to UIViewControllerAnimatedTransitioning.
@interface STKAppDelegate () <UITabBarControllerDelegate, UIViewControllerAnimatedTransitioning>
@end

@implementation STKAppDelegate

- (NSTimeInterval)transitionDuration:(id<UIViewControllerContextTransitioning>)transitionContext
{
    return 0.5;
}
Next, the tab bar controller will tell the Animation Controller to perform the animation. It is the responsibility of this method to do the following:
1. Add the incoming view to the view hierarchy.
2. Animate the old view off the screen.
3. Animate the new view on the screen.
4. Report back to the tab bar controller when the animation finishes.
For fun, we’ll make this animation slide the new view in from the top while the old view slides off the screen downwards. Let’s implement this method step-by-step to figure out what is happening. First, a stub:
- (void)animateTransition:(id<UIViewControllerContextTransitioning>)transitionContext
{
}
Notice that this method takes an object that conforms to UIViewControllerContextTransitioning. The context object will contain just enough information for the Animation Controller to perform the animation. Anything more, and the tab bar controller would allow too much access to its internal structure; anything less, the animation controller wouldn’t be able to do its job. In other words, the context object is a safe communication proxy between the tab bar controller and the animation controller.
The first items the animation controller will need to grab from the context object are the two view controllers that are participating in the transition.
- (void)animateTransition:(id<UIViewControllerContextTransitioning>)transitionContext
{
    UIViewController *incomingVC =
        [transitionContext viewControllerForKey:UITransitionContextToViewControllerKey];

    UIViewController *outgingVC =
        [transitionContext viewControllerForKey:UITransitionContextFromViewControllerKey];

}
Now, we have pointers to the incoming view controller (incomingVC) and the outgoing view controller (outgoingVC). Next, we need to add the new view controller’s view to the view hierarchy of the tab bar controller.
- (void)animateTransition:(id<UIViewControllerContextTransitioning>)transitionContext
{
    UIViewController *incomingVC =
        [transitionContext viewControllerForKey:UITransitionContextToViewControllerKey];

    UIViewController *outgoingVC =
        [transitionContext viewControllerForKey:UITransitionContextFromViewControllerKey];

    [[transitionContext containerView] addSubview:[incomingVC view]];
}
The tab bar controller has prepared the context object with a containerView property. This containerView is a view the tab bar controller manages that will directly contain any of its child view controller’s views. Note the containerView doesn’t have to be (and in fact, is not) the view of the tab bar controller. The tab bar controller is not giving access to its whole view hierarchy to the animation controller, but just the parts that the animation controller needs to know about.
Next, the final positioning of the view that will be swapped in has already been determined by the tab bar controller and added to the context. It wouldn’t make sense for the tab bar controller to cede layout responsibility to the animation controller – only the tab bar controller knows where the view should go. We can grab the rectangle that will guide our animation.
- (void)animateTransition:(id<UIViewControllerContextTransitioning>)transitionContext
{
    UIViewController *incomingVC =
        [transitionContext viewControllerForKey:UITransitionContextToViewControllerKey];

    UIViewController *outgoingVC =
        [transitionContext viewControllerForKey:UITransitionContextFromViewControllerKey];

    [[transitionContext containerView] addSubview:[incomingVC view]];
    CGRect incomingDestinationFrame = [transitionContext finalFrameForViewController:incomingVC];

}
Finally, we can animate this transition:
- (void)animateTransition:(id<UIViewControllerContextTransitioning>)transitionContext
{
    UIViewController *incomingVC =
        [transitionContext viewControllerForKey:UITransitionContextToViewControllerKey];

    UIViewController *outgoingVC =
        [transitionContext viewControllerForKey:UITransitionContextFromViewControllerKey];

    [[transitionContext containerView] addSubview:[incomingVC view]];

    // The final destination of the incoming view is where the tab bar controller wants it
    CGRect incomingDestinationFrame = [transitionContext finalFrameForViewController:incomingVC];

    // The initial location of the incoming view is above the screen
    CGRect incomingInitialFrame = incomingDestinationFrame;
    incomingInitialFrame.origin.y -= incomingDestinationFrame.size.height;

    // The final destination of the outgoing view is underneath the screen
    CGRect outgoingDestinationFrame = [[fromVC view] frame];
    outgoingDestinationFrame.origin.y =
        outgoingDestinationFrame.origin.y + outgoingDestinationFrame.size.height;

    [[toVC view] setFrame:incomingInitialFrame];

    [UIView animateWithDuration:[self transitionDuration:transitionContext] animations:^{
        [[toVC view] setFrame:incomingDestinationFrame];
        [[fromVC view] setFrame:outgoingDestinationFrame];
    } completion:^(BOOL finished) {
        [transitionContext completeTransition:finished];
    }];
}
Notice we compute the initial placement of the incoming view controller’s view and the final position of the outgoing view controller to suit our animation desires. Then, we perform the animation. The important bit here is that the completion block of the animation sends a message back to the context that the transition has completed. The context object relays this completion to the tab bar controller so it can finalize its own state and send viewDidAppear/viewDidDisappear messages to its children.
The finished value is important, since an animation could potentially be interrupted and therefore not completed. This would indicate to the tab bar controller that the transition was not fully completed. For example, if during the animation between tabs, the user were able to tap on another tab, the tab bar controller would need to know. (A tab bar controller specifically restricts this, but other container view controllers may not.)
You can run this application and animate between different views in your tab bar controller. In the next installment, we’ll add the ability to customize transitions to the view controller container we wrote in previous installments. (I promise it won’t take 5 months this time.)
That Other Approach
As a final note, I mentioned that there is another approach for designating that Animation Controller object. In this example, we let the app delegate handle the animation. In some situations, it may make sense to create an object for the express purpose of being an Animation Controller, i.e., conforming to UIViewControllerAnimatedTransitioning. For example:
@interface STKVerticalTransitioner : NSObject <UIViewControllerAnimatedTransitioning>
@end

@implementation STKVerticalTransitioner

- (NSTimeInterval)transitionDuration:(id<UIViewControllerContextTransitioning>)transitionContext
{
    ...
}
- (void)animateTransition:(id<UIViewControllerContextTransitioning>)transitionContext
{
    ...
}

@end
And then the delegate for the tab bar controller would do something like:
- (id <UIViewControllerAnimatedTransitioning>)tabBarController:(UITabBarController *)tabBarController
            animationControllerForTransitionFromViewController:(UIViewController *)fromVC
                                              toViewController:(UIViewController *)toVC
{
    return [[STKVerticalTransitioner alloc] init];
}
This ends up being okay, because the tab bar controller will actually retain its animation controller for the duration of the animation. There are two situations where you would want to take this approach.
First, if there are multiple animations that could occur depending on some other context (like the state of the application or which view controllers are being swapped), it makes more sense to separate out different animation logic into their own class instead of sprinkling if statements into a monolithic animation controller.
The other reason to break off an animation controller into its own class is if you plan on reusing that animation in many places, or across projects.
