One of the challenges to the iOS Auto Layout system when it first came out was that the interface for editing constraint-based XIB files was unforgiving.
After many improvements to Xcode, this is no longer the case, but there are a lot of controls to sift through when building constraints, and that can be prohibitive to a beginner and costly to someone with experience.
In this article, I’ll identify some key UI elements of the Auto Layout interface and talk about some useful tips for working with Auto Layout. I’ll also go over my general approach to setting up constraints.
I will be writing a follow-up article to this one on some common constraint techniques for things like UIScrollView and auto-sizing rows of items, so stay tuned for that in the next two weeks.
Canvas Setup
With a XIB file open in Xcode, open up the Editor menu. There is a menu item named Canvas that has a few toggleable settings for configuring how a XIB file appears when editing it. Here’s what mine looks like:
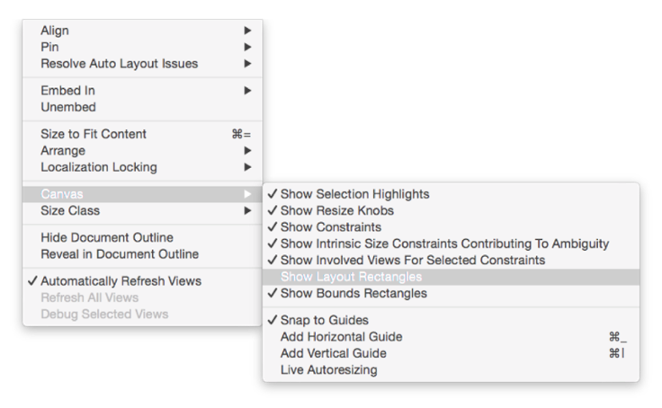
As you can see, I keep a lot of these options on because they help me visualize the contents of a XIB file. Briefly, here is what each option does:
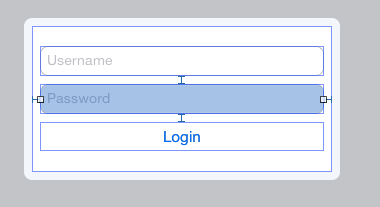
- Show Selection Highlights will attempt to highlight a view when it is selected in the editor. This is helpful for quickly seeing which view you have selected; here, the password field is selected and therefore is darkened because of this setting.
- Show Resize Knobs is a must; it displays the boxes on the edges of the selected view that allow you to resize it.
- Show Constraints is another must, as it will show lines that represent constraints that impact the currently selected view. In the previous image, the bars stemming from the edges of the password field are all constraints.
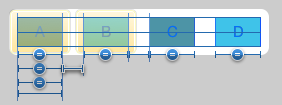
- Show Involved Views For Selected Constraints will highlight views in yellow when they are directly impacted by a constraint that is selected. Here, the horizontal spacing constraint between A and B is selected and thus the buttons A and B are highlighted:
- Show Layout Rectangles will show all of the constrainable items of a view that aren’t normally visible as lines. For example, views margins and baseline items aren’t readily apparent when looking at a view; this option will show them as red lines. (I keep this one off because it is too busy for me). The following diagram shows a thick red line underneath the text of the four buttons (the baseline) and the inset red rectangle is the container for the buttons margin rectangle.

- Show Bounds Rectangles will draw a thin blue line around every view. (You can see these blue lines in the previous diagrams.) I prefer to keep this one on; it makes visualizing clear or white background views much easier.
Adding Constraints to a View
There are three standard ways to add constraints and a few hidden ones. As such, adding constraints can be confusing. These multiple options can yield many different workflows and this is very apparent when watching a developer build constraints; everyone does things a little differently.
I think most developers are familiar with the four buttons on the bottom right corner of a XIB file that pop up menus for adding constraints.
![]()
The first item brings up a popup to apply alignment constraints. The second item is a popup for pin constraints. At the end of the day, there is no special difference between alignment and pin constraints – they all just create instances of NSLayoutConstraint to be encoded into a XIB file – but they are good logical groupings for the items of a view that a constraint affects.
(We’ll talk about the third item later, and we’ll safely ignore the fourth item.)
I use the first two items for creating constraints when I’m operating on a single view and want to fix its width/height or pinning/aligning it to its superview. To be clear, when I’m establishing constraints between two sibling views, I don’t use these menus – these menus are really only useful for the items I just mentioned.
These menus only work when a view is selected. In the following diagram, I just dragged a ‘Button’ onto the canvas, selected it and opened the pin menu.
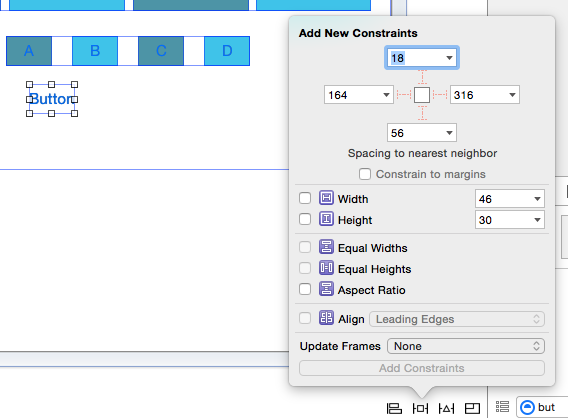
By clicking on the dotted red lines in the top section or checking the boxes in the bottom sections, I can stage constraints I wish to add to the selected view. To commit these staged changes, I click the ‘Add Constraints’ button.
Notice that many of the constants for these constraints come prepopulated with a value. Xcode will inspect the current position of the selected view and the current position of the nearest view in that direction and suggest the constraint that would keep the selected view in its current position. For example, the top constraint’s constant is prepopulated with 18 because the button’s top edge is 18 points away from the bottom edge of the container with buttons A, B, C, D. Likewise, the width constant is prepopulated with 46 because the current width of that button is 46.
Some people prefer to move the view into the desired position and then open this menu and click the constraints that have been prepopulated, since those prepopulated values will pin the selected view into the position they have moved the view into.
I prefer a different approach – I drag the view into the general vicinity of where I want it to be and resize it to about the size I want it to be first. Then, I open up this menu and enter the actual values for each constraint I want to add. By entering a value in a field and hitting ‘Tab’, it jumps me to the next constraint value and automatically stages that constraint. At the end, I hit return to commit the constraints – which is the keyboard shortcut for the ‘Add Constraints’ button. This way, I never have to touch the mouse, because the mouse is slow.
Notice that the numeric input boxes have a disclosure button within them. By default, Xcode assumes this constraint will be applied to the selected view and the nearest view in that constraints direction. Selecting this disclosure allows you to select another view on the canvas to apply the constraint. For example, in the previous diagram, the assumed constraint is between the selected ‘Button’ and the row of A, B, C, D buttons. Revealing the disclosure tab of the top constraint will show every view above the button, including the top of its superview as options for the constraint. I don’t like this approach; it’s not as intuitive to me as another approach for establishing relationships between sibling views as we’ll see in a moment.
The alignment menu is similar, but most of the options in the alignment menu expect two views to be selected. After all, the options in the alignment menu are aligning two views together. Again, I have another approach for establishing constraints between two views that we’ll see in a moment, but the alignment menu does have one useful section: aligning horizontal and vertical centers to the superview. When I want to center a view in its superview, I select the view and fire up this alignment menu.
To reiterate, I only use the pin and alignment menus for the following items: pinning a view’s width and height, pinning a view to its superview and centering a view in its superview. Before we move on to adding other constraints, I want to point out that all of the items available in these menus are also available in the Editor menu in the menu bar of Xcode. This means that you can create keyboard shortcuts for all of these constraint creators. I’ve just figured this out for myself, so I’ve yet to come up with a reliable set of keyboard shortcuts, but I’m certainly going to do this today. Again, anytime I can avoid using the mouse, I do.
Adding Constraints Between Views
When I want to create constraints between sibling views, I use the good ole’ fashioned control-click method. In the diagram, I’ve selected the ‘Button’ and then control-clicked on it and, without letting go of the click, dragged my mouse over to the view that contains the buttons A, B, C, D. When I let go, the menu of possible constraints pops up.
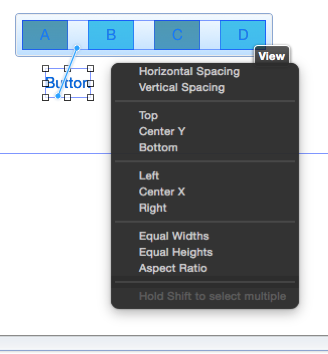
If I click on a constraint, it will establish that constraint between these two views. I may also hold shift while I click to establish multiple constraints at a time, which is something I do often. Establishing constraints in this way will automatically set the constants of those constraints to the current positions of the two views I’ve selected. For example, in the previous diagram, if I were to select the ‘Left’ constraint to align the left edge of the ‘Button’ to the ABCD container, the constraint’s constant would be set to roughly 20 here – the current distance from the left edge of the button to the left edge of the container.
As I mentioned earlier, my approach isn’t to move views into their exact position and then set the constraints based on the current canvas value. Instead, I prefer to move the view into the general vicinity and create the necessary constraints first and then modify their constants later. This allows me to get the exact values I want instead of eyeballing them on the canvas.
For example, if I wanted to pin this button so that it was eight points beneath the ABCD container and aligned along the left edges as well as pin the button’s width and height, I’d do the following first:
- Use the control-click method to drag from the button to the ABCD container, then select the Left and Vertical Spacing from the dark menu.
- Use the pin menu to pin the width and height while the button is selected. (Although, I probably wouldn’t pin a button’s width or height because its intrinsic content size will do a better job of this, but let’s just pretend.)
This would create the constraints to fully qualify the button’s frame, but it wouldn’t be in the right position: the button would be more than eight points below the ABCD container and its left edge about 20 points from the left edge of the ABCD container.
I would then go edit those constraints’ constants.
Editing Constraints
Using the previous example of setting up the constraints for that button when it was not in the right position, I’d end up with constraints that look like this:
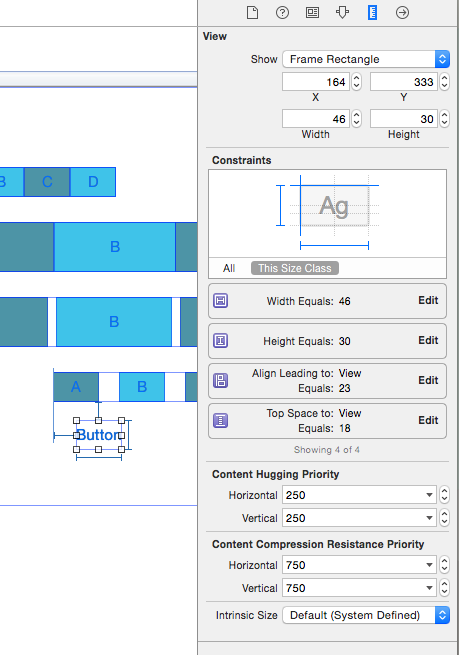
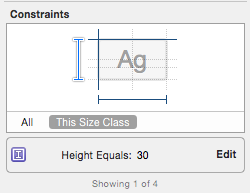
The left and vertical spacing constraints aren’t what I want here. To edit those constraints into the desired position, I fire up the Size inspector when the button is selected. In here, I can see all of the constraints that are attached to this selected button. Notice that the constraints have their constant values: the width’s constant is 46, the leading (left) edge of the view is 23 points away from the leading edge of that container view, and so on.
Clicking on an Edit button for a constraint will pop up a quick-edit menu:
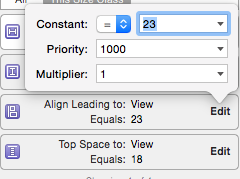
I’ll enter the value 0 here to align the left edges of the button and the container, and this will automatically move the Button to that position on the canvas. I’ll repeat the same for the top space constraint. The motivation here is that I can exactly define my constants numerically and it will reposition the view for me in one step.
There are a few other options I can set in this quick-edit menu, like the equality operator, priority and multiplier. If I want to dig even deeper into the constraint, I can double-click on the constraint itself and it will select the constraint in the inspector:
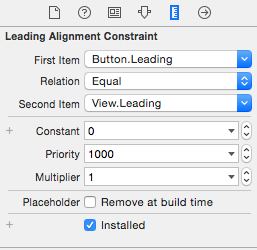
In this inspector, I can change the same things in the quick-edit menu, but I can also configure the items involved in the constraint. This is useful if I’m creating a constraint between items that isn’t possible with the pin/align menus or the control-click method. For example, if I wanted to pin the leading (left) edge of the button to the CENTER of that container view, I could modify the Second Item here to be View.Center X.
Anytime a constraint is selected, I can hit the delete key and it will remove it.
Finding and Viewing Constraints
As view hierarchies become more complex, it can be difficult to find the constraint you wish to modify. One way to select a constraint is to click on it on the canvas – but this is difficult or impossible for some constraints and the clickable area on a constraint is pretty small to begin with.
Therefore, there are a few other ways for finding constraints. In the previous section, I talked about selecting a view and then viewing its Size inspector to see all constraints that are attached to it. This is typically my go-to approach for finding constraints. But even with this approach, a view with a lot of constraints can be difficult to navigate. Fortunately, there is a filtering mechanism in the size inspector.
The constraint filter allows you to filter the list of visible constraints for the selected view. There are a number of lines in the constraint filter to represent the different items of a view that can be constrained. If a constraint is impacting that item, the line in the constraint filter will be solid. In this diagram, you can see that there are four lines that are solid (the top, left, width and height) and there are five lines that are grayed out and dotted (center Y, center X, baseline, bottom and right).
Additionally, I’ve clicked on the height constraint line to select it – the outlined white and blue line. This applies the filter, and as you can see, all of the constraints that are impacting the height of this view are showing in the constraints area. The others are hidden. I can click anywhere on constraint filter to reset it.
Another place I can find constraints is in the outline view on the left-hand side of the XIB editor area. The constraints are organized as disclosures underneath view instances in the outline. The constraint will appear underneath the view that is the common ancestor of the views in a constraint. Thus, a constraint that only impacts one view (a width or height constraint) shows up directly underneath that view, whereas a constraint that impacts two views will show up under their superview.
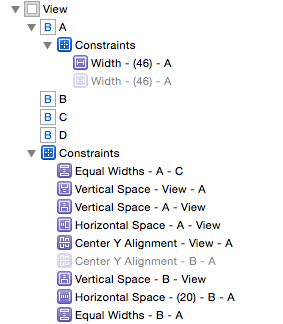
By selecting constraints in this area, they will be selected in both the canvas and the inspector area. I seldom use this area to find constraints.
Also in the outline area is the errors and warnings button for the entire view. Clicking on the circular arrow icon that is either red or yellow here will navigate you to a list of those issues.

If there are any issues with constraints that would result in a problem at runtime, those will be errors. Ambiguous constraints, conflicting constraints and views that can’t fully define their frame are usually what you see as errors. The circular icon with the arrow will be red in this case, and you should most certainly take action.
Warnings are reserved for a mismatch between where a constraint will place a view and where the view is currently placed on the canvas. As in the diagram above, this warning is saying that the view ‘C’ is expected to have an x value of 247, but on the canvas, it is at 248. A warning doesn’t technically hurt anything. When your application is running, the views will abide by the constraints and not by the ‘actual’ positions on the canvas. Thus, this particular button C would have an x value of 247 when running.
(As an aside to this point, the area in the size inspector that allows you to directly modify the frame is fairly useless. As noted above, at runtime, your view will abide by the positions determined by the constraints, not by positions of the views on the canvas. Updating the frame rectangle only changes the position of a view on the canvas; I haven’t touched that section of the size inspector in a few years.)
Instead, the warning tells you that what you see on the canvas isn’t what your view will look like when inside the application. You can click on the warning icon to pop up a menu that gives you the options to update the frame of the misplaced view or update the constraint. If you update the frame, it adjusts the position of the view to match the constraint on the canvas. If you update the constraint, it changes the constraints constant to match that of the position on the canvas.
One thing to note about errors in this section is that they cascade. For example, let’s say I have a container with four buttons (just like the ABCD container in previous diagrams). If the constraints between the buttons and the container are all set up correctly, but the container itself doesn’t have a constraint that pins its left edge in its superview – there would be errors for the container and all four of those buttons indicating that they don’t have a value for their X position. And this would be true – but constraining the left edge of the container would fix all five of those errors. In other words, there isn’t a one-to-one mapping of errors and constraints needed.
Useful Keyboard Shortcuts
One thing I haven’t talked about yet was that third menu at the bottom right corner of the XIB editor area for resolving issues. When a view is selected, this menu allows you to update frames/constraints just like in the warning/error panel. This is useful for editing constraints because depending on how you edit them, the constraint may get updated but the view on the canvas does not. I find it useful to use the keyboard shortcut for the ‘Update Frames’ item in this menu, although I have to change mine because Cmd-Opt-= is zoom in at the operating system level for me.
Another useful keyboard shortcut is Ctrl-Shift-Click on a view in the editor area. When multiple views are stacked on top of each other in the editor area, it is difficult to select anything but the top-most view. Ctrl-Shift-Clicking on a view brings up a popup with every view underneath your cursor and allows you to select the one you want. As part of this shortcut, also note that is is possible – and a good idea – to name your views in the outline area. You can click on a view and hit the return key to give it a name, like ‘Button Container’ or ‘Background’. This name also shows up in the Ctrl-Shift-Click popup menu.
Another hidden shortcut is for resizing views that are already constrained. A view that has a pinned height and width cannot be resized via the resizing controls when selected. Sometimes, however, you will want to resize that view, shuffle around its content, and then apply new constraints to it. To resize something that is pinned, hold down command while dragging on its resizing control.
