The new 2016 13 and 15 inch MacBook Pros were just unveiled during yesterday’s Apple’s MacBook Pro Event. By far the most talked about feature at the Apple event is the new Touch Bar which replaces the function keys on the traditional keyboard with a 2170 x 60 pixel, multi-touch, retina display. The biggest advantage the new Touch Bar has over the traditional function keys is the ability to dynamically change, not only based on what app is currently in use but also based on what is happening in that application and it can even respond to system events like incoming calls.
Apple has given us a preview of some of the ways the new Touch Bar can be used to enhance the user experience of using a MacBook Pro. In addition to the traditional function key responsibilities like volume and brightness, there is now a Siri button in the system controls. Other useful applications of the Touch Bar are sliders and scrubbers for more precise control. As a developer, I am really looking forward to seeing how Touch Bar supports applications like Xcode and Terminal that will allow me to develop applications more efficiently.
Related: Aqueduct – An Open-source, Server-side, Web Framework Written in Dart
Developing for the MacBook Pro Touch Bar
The Touch Bar consists of 3 main regions. The left most region is called the System Button and it is where the escape/done/cancel key lives. The right most region is the control strip which contains brightness and volume controls as well as Siri. The middle region is the App region, and it is the part of the Touch Bar that we as developers will be able to customize in our apps.

In order to develop these custom experiences, Apple has created 7 NSTouchBarItem subclasses: – NSSliderTouchBarItem contains a slider with an image on both sides.

– NSPopoverTouchBarItem lets you expand a single control to a set of related controls.


– NSColorPickerTouchBarItem is a color picker presented from a popover.
 –
– NSSharingServicePickerTouchBarItem is also presented from a popover and provides you with access to system sharing services.

– NSCandidateListTouchBarItem presents the user with a list of options, such as for autocomplete.
– NSCustomTouchBarItem which can contain any custom view, for example an NSButton.

– Finally NSGroupTouchBarItem which can be used a container for other items.
To develop for the Touch Bar without having a new MacBook Pro, we can use the Touch Bar simulator included in Xcode 8.1; just go to Window->Show Touch Bar in Xcode. The option did not show up for me at first, but I fixed it by downloading the latest version of Mac OS Sierra from here.
Related: When Should I Use Blocks and Closures or Delegates for Callbacks?
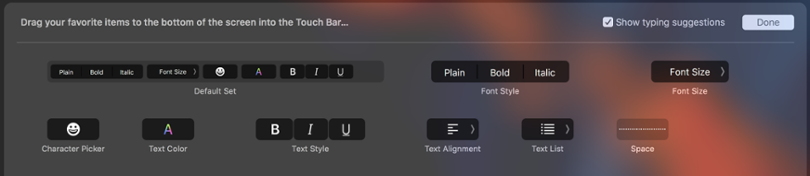
Customization
The feature that excites me the most as a developer is the new Touch Bar customization. Apple has made it very easy for us developers to allow users to customize its Touch Bar experience within our apps. Since you may have multiple Touch Bar configurations for different tasks within a single app, you provide a globally unique customizationIdentifier for each Touch Bar configuration. Then you supply a list to defaultItemIdentifiers for the default items, customizationAllowedItemIdentifiers for all of the optional items and optionally a customizationRequiredItemIdentifiers if your app has required items.
Conclusion
I believe that the Touch Bar is a bigger deal than it seems at first glance. It represents a natural migration of technology from iOS to the Mac, but not toward some kind of merged single operating system as many people expect. Rather it is a recognition that the best possible computing experiences on iOS and OS X require different interaction paradigms, even if they both take advantage the same underlying touchscreen technology.
