Scroll views are a great way to get more content on a screen than can actually fit, especially for smaller devices. However, it can be difficult for users to tell that they are able to scroll for more content without some other visual indication. Fading out the edge of the content is a clean, simple way of hinting to the user that more is available. It is also quick and easy to do, but there are several ‘gotchas’ that can slow the process down considerably, especially when you’re working inside of a scroll view. I’ll walk you through the process, including the gotchas, in hopes of making this a smooth, easy feature for you to add!
If you’d like to just look at the final code it’s posted here on Github.
Making a gradient layer
To create the fading out effect we first need to create a CAGradientLayer, which is fairly simple.
Start with the “Single View Application” template in Xcode, and in ViewController.swift add the following lines to viewDidLoad():
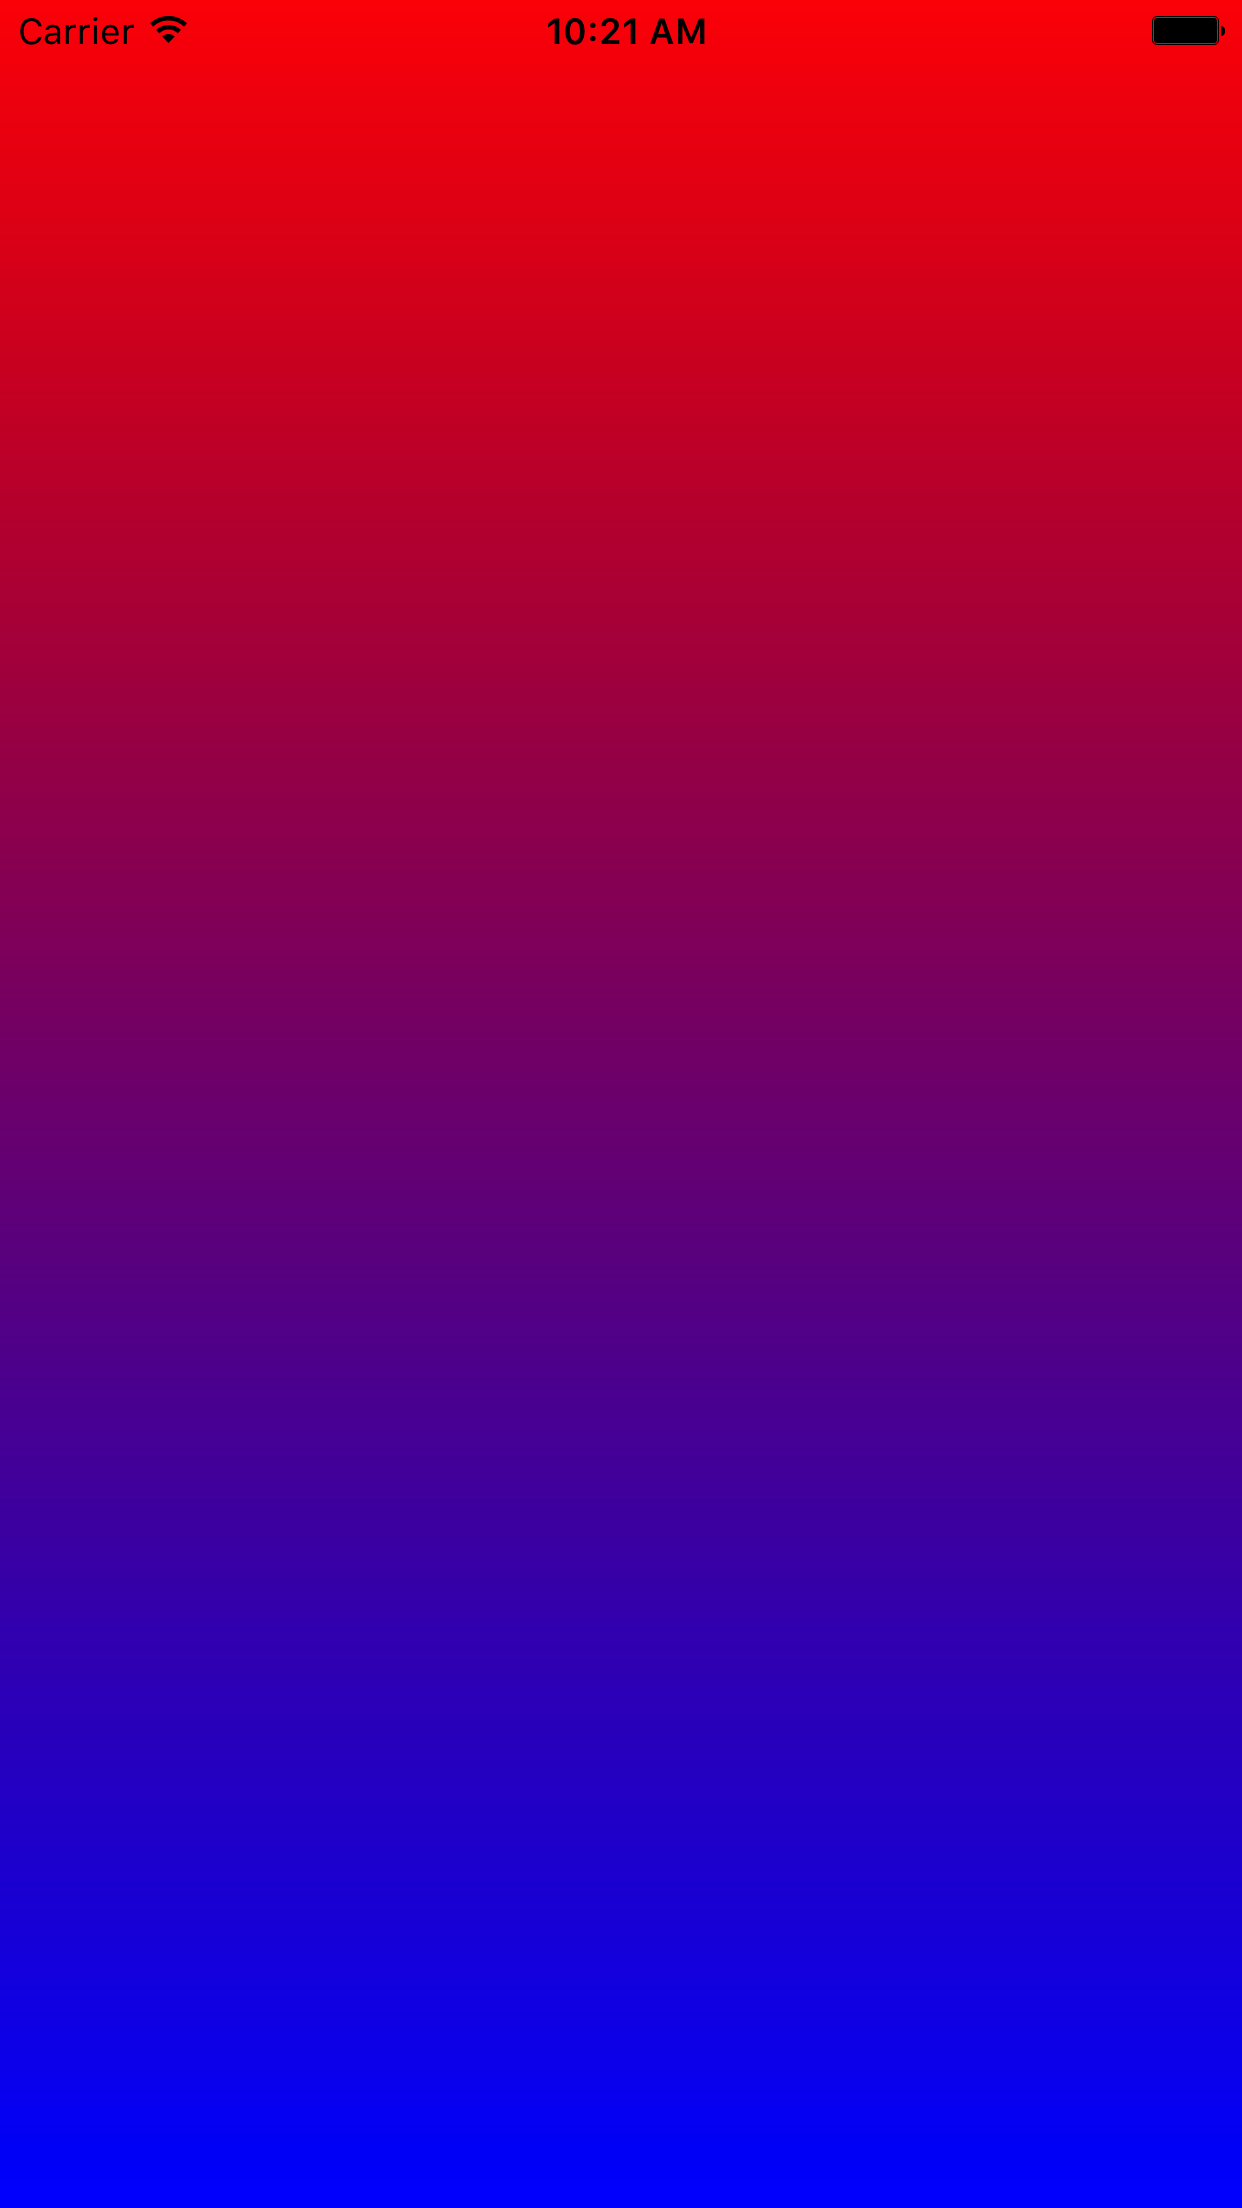
let gradient = CAGradientLayer()
gradient.frame = view.bounds
gradient.colors = [UIColor.red.cgColor, UIColor.blue.cgColor]
view.layer.addSublayer(gradient)
Run the app and you should see a red to blue vertical gradient covering the whole view.
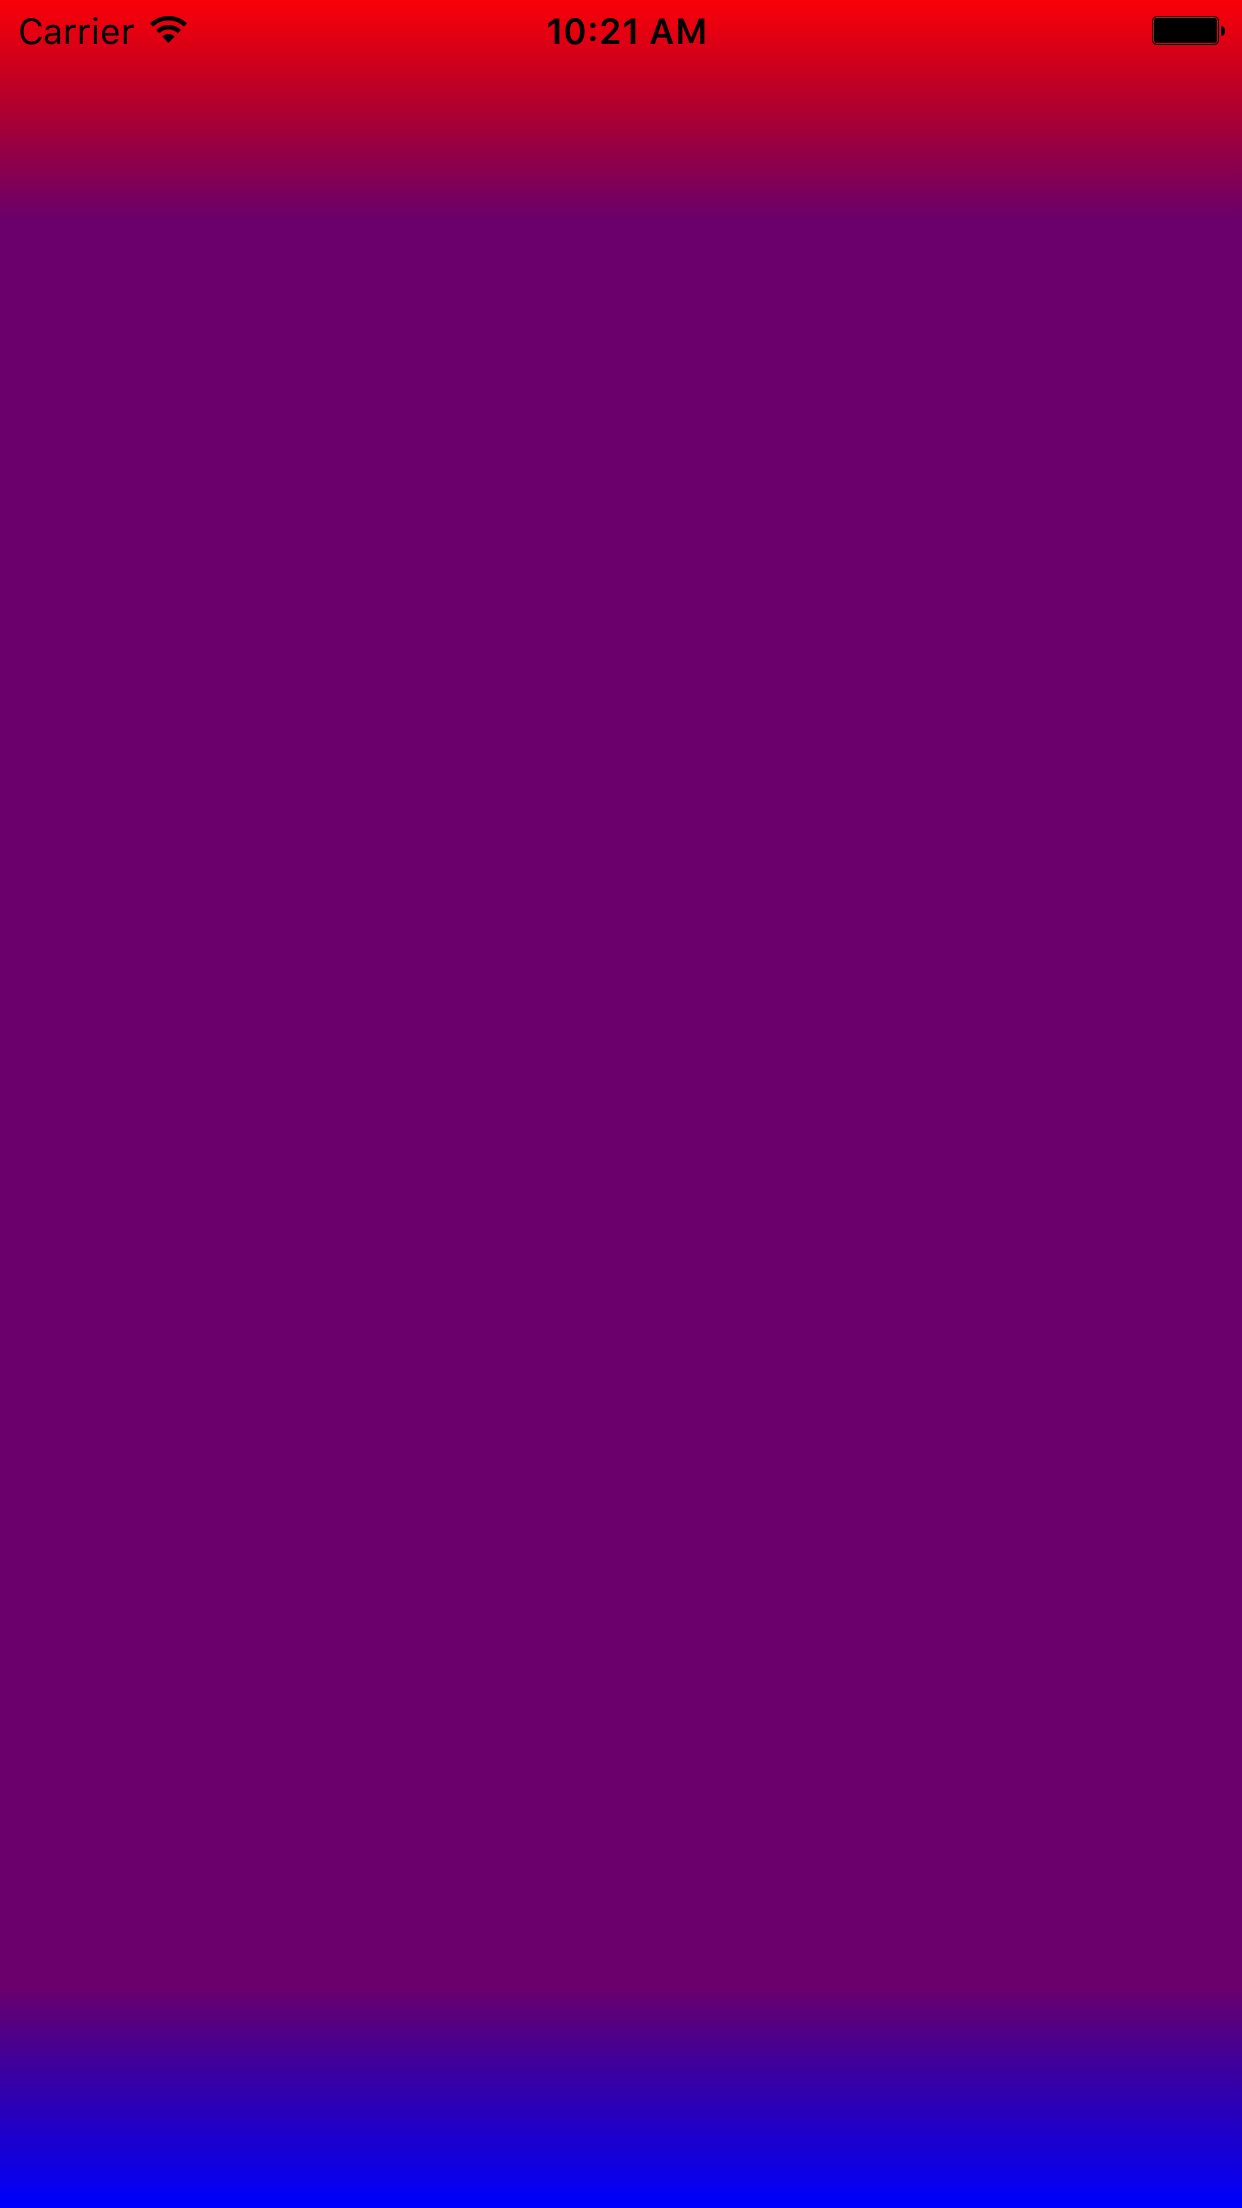
You can add any number of colors to the gradient, which are evenly spaced by default, but this can be changed as well. CAGradientLayer has a locations property that you can set to change the distribution of the colors. These are values between 0 (the top of the view) and 1 (the bottom of the view) and must be increasing in value.
So to make a view that is mostly purple that transitions into red at the top and blue at the bottom, we would change the code colors to:
gradient.colors = [UIColor.red.cgColor, UIColor.purple.cgColor, UIColor.purple.cgColor, UIColor.blue.cgColor]and then add the following line:
gradient.locations = [0, 0.1, 0.9, 1]Each location corresponds to one of the colors. For these locations, the gradient transitions from red to purple from the top of the view (0) to 10% down the view, then from purple to purple, which gives us the long solid purple color, and then the bottom 10% of the view changes from purple to blue.
One gotcha of working with layers is that if you rotate the device, you’ll see that the layer does not rotate with the view.
To make sure that our gradient is updated when the view changes, we need to update its frame when the view’s frame changes. A quick way of doing this is to hold a reference to the gradient layer by making it a property of the ViewController and set the layer’s frame again whenever it lays out subviews, changing our ViewController code to look like this:
    private var gradient: CAGradientLayer!

    override func viewDidLoad() {
        super.viewDidLoad()

        gradient = CAGradientLayer()
        gradient.frame = view.bounds
        gradient.colors = [UIColor.red.cgColor, UIColor.purple.cgColor, UIColor.purple.cgColor, UIColor.blue.cgColor]
        gradient.locations = [0, 0.1, 0.9, 1]
        view.layer.addSublayer(gradient)
    }

    override func viewDidLayoutSubviews() {
        super.viewDidLayoutSubviews()

        gradient.frame = view.bounds
    }
}
There is a lot more that you can do with CAGradientLayer and better ways of handling the rotation animation, but for our purposes this is all we need.
Applying the gradient layer as a mask
Now to take this gradient and use it to fade out content, we need to set it as the mask for our view’s layer. For the colors, whatever we want visible we need to set to a color (I’ll use black) and anything we want hidden we need to set it to a clear color.
So our colors are now:
gradient.colors = [UIColor.clear.cgColor, UIColor.black.cgColor, UIColor.black.cgColor, UIColor.clear.cgColor]To see a fade, we first need to add some content. Go into Main.storyboard and add a UILabel filling the view and give it placeholder text of your choice. My favorite is Buzzword Ipsum.
Now, instead of adding our gradient as a sublayer we will set it as a mask:
view.layer.mask = gradientRun the app and…whoa!? This isn’t what we want at all. By applying our gradient mask to the view itself, we are fading out the entire view including its background.
We just want to apply it to our content. Create an IBOutlet to the label you created, and then set the gradient as the label’s mask instead (while also changing the gradient’s frame to match the label), so your code should now look like this:
class ViewController: UIViewController {
    @IBOutlet weak var label: UILabel!
    private var gradient: CAGradientLayer!

    override func viewDidLoad() {
        super.viewDidLoad()

        gradient = CAGradientLayer()
        gradient.frame = label.bounds
        gradient.colors = [UIColor.clear.cgColor, UIColor.black.cgColor, UIColor.black.cgColor, UIColor.clear.cgColor]
        gradient.locations = [0, 0.1, 0.9, 1]
        label.layer.mask = gradient
    }

    override func viewDidLayoutSubviews() {
        super.viewDidLayoutSubviews()

        gradient.frame = label.bounds
    }
}
Now, our content is fading out properly!

Using gradient layer in scroll views
Working with CAGradientLayer gets trickier when you need to modify its properties, which comes up often when working with scroll views.
Add a UIScrollView to your storyboard with constraints to have it fill the view. Then add an empty UIView to the scroll view with constraints to fill the scroll view, but also with equal widths to the ViewController‘s view. Then add the label to this view, also with constraints to fill that view with a little padding.
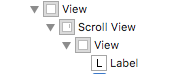
So here is what our view hierarchy looks like:
And here are the constraints on the view between the scroll view and the label:
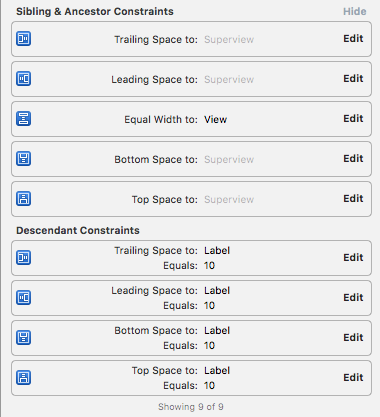
This view will serve as a content view for whatever we want to put in the scroll view and will keep it scrolling only vertically by being equal widths with the ViewController‘s view.
Create a new IBOutlet to your scroll view and add the gradient layer mask to the scroll view. It looks fine initially, but when you scroll you’ll see that the mask doesn’t follow the scroll:

We need to update the gradient layer’s frame as the scroll view scrolls to make it look how we’d expect. In the storyboard, set the ViewController to be the scroll view’s delegate. In code, declare ViewController as a UIScrollViewDelegate and implement scrollViewDidScroll. Break out the gradient frame-setting code into its own method since we will now want to call this both when the scroll view scrolls and when the ViewController lays out its subviews:
override func viewDidLayoutSubviews() {
    super.viewDidLayoutSubviews()

    updateGradientFrame()
}

func scrollViewDidScroll(_ scrollView: UIScrollView) {
    updateGradientFrame()
}

private func updateGradientFrame() {
    gradient.frame = CGRect(
        x: 0,
        y: scrollView.contentOffset.y,
        width: scrollView.bounds.width,
        height: scrollView.bounds.height
        )
    }
Run the app and you’ll see that the fade now moves with the scroll view, but it feels horribly laggy. Luckily, this isn’t a performance issue, but a feature of CAGradientLayer. Property changes on CAGradientLayer are animated by default (The CA stands for Core Animation). There are many different ways of preventing animations for property changes, but for this fade we are never going to want anything to be animated. The best way that I’ve found to prevent any unwanted animation in a CAGradientLayer is to make the ViewController the gradient layer’s delegate and return NSNull for all actions. Now the code for the ViewController should look something like this:
class ViewController: UIViewController, UIScrollViewDelegate, CALayerDelegate {
    @IBOutlet weak var scrollView: UIScrollView!
    @IBOutlet weak var label: UILabel!

    private var gradient: CAGradientLayer!

    override func viewDidLoad() {
        super.viewDidLoad()

        gradient = CAGradientLayer()
        gradient.colors = [UIColor.clear.cgColor, UIColor.black.cgColor, UIColor.black.cgColor, UIColor.clear.cgColor]
        gradient.locations = [0, 0.1, 0.9, 1]
        gradient.delegate = self
        label.layer.mask = gradient
    }

    override func viewDidLayoutSubviews() {
        super.viewDidLayoutSubviews()

        updateGradientFrame()
    }

    // MARK: - UIScrollViewDelegate
    func scrollViewDidScroll(_ scrollView: UIScrollView) {
        updateGradientFrame()
    }

    // MARK: - CALayerDelegate
    func action(for layer: CALayer, forKey event: String) -> CAAction? {
        return NSNull()
    }

    // MARK: - Convenience
    private func updateGradientFrame() {
        gradient.frame = CGRect(
            x: 0,
            y: scrollView.contentOffset.y,
            width: scrollView.bounds.width,
            height: scrollView.bounds.height
        )
    }
}
Related: UIView Transformations and Animations
Moving the fade to scroll view content
Similar to the problem we ran into trying to apply a fade to the root view of the ViewController, you can run into issues when applying a fade to the entire scroll view. To see this in action, let’s put an image behind the scroll view and give the middle content view we added a dark semi-transparent background.
Add an image view to the root view behind the scroll view, set up its constraints to fill the view and give it whatever image you like. Set the background color on the content view to a semi-transparent color (I went with black with 75% alpha) and change the label’s text color to white so that we can see it against the dark background.
In the ViewController‘s didLayoutSubviews() set a top content inset on the scroll view almost equal to its height so that we can scroll down to reveal the image fully:
override func viewDidLayoutSubviews() {
    super.viewDidLayoutSubviews()

    scrollView.contentInset = UIEdgeInsets(top: scrollView.frame.height - 40, left: 0, bottom: 0, right: 0)
    updateGradientFrame()
}
When you run the app, you can see that the content background also fades out with the content, making the background image appear brighter at the top and bottom.

This can be fixed simply by setting the gradient as the label’s layer’s mask, but this time without adjusting any of the math.
label.layer.mask = gradient
Final polish
While this is everything you need to know to apply fades to content, it is still just the beginning. You can tweak the locations of the gradient the same way you tweak its frame to produce varying effects. Currently, our app fades the bottom 10% of the content, even when it is the last of the content. In updateGradientFrame() you can also change the locations of the gradient to not show a fade when you’ve hit the bottom of the scroll view’s content or hide the bottom fade when only a little content is peeking up from the bottom. You can adjust the locations to make a title that is never faded out, even when scrolled to the bottom. The CALayerDelegate‘s action(for:forKey event:) returning NSNull will also make sure that these location changes do not appear laggy. You also have access to all of CALayer‘s other animatable properties for creating interesting effects. Go wild, add some extra polish to your app!


Thanks for this!
Hey Marcus,
This was really helpful to understand how gradients work in this context.
I’m stuck now at the point you mention in the last paragraph: having the fade disappear when the scroll view is at the far top or bottom.
Do you have a hint for a beginner like me what kind of code I have to add in updateGradientFrame()?
Best regards,
Andreas
it’s awesome.
solved my problem.
thx
and we find an easier way for scrollview,
just add the scrollview to a view that has a mask we made, look the same .